4 steps that will help you know if you run safely

With the change of season that robs us of sunlight, the season of running starts when the streetlights have already been lit. Although training at night can be relaxing, it also requires a little more caution, not only in wearing reflective clothing with reflective tape to be more visible but also in avoiding being attacked by sexual assailants, as was the case with the athlete Julia Takacs last August.

So much so that in Spain a platform has been created that helps to put in contact girls who have in common their hobby of running, but do not want to do it alone. It is known as Synchronized and there are already more than 11,000 registered in this running club. Also, they usually make massive gatherings where thousands of girls from all over the country congregate to run together.

But if it is the case that you cannot do it accompanied, the runner and self-defense instructor Julie Barron Morrill has given us four guidelines so as not to become potential victims of an attack while we run and successfully exit the situation.

Think of a plan for an awkward situation or attack. “Try to anticipate how you would respond to an assault before it occurs.” Morrill advises going head high and shoulders back: “An attacker will not choose someone self-assured and alert.”

If something happens, the first thing to do is run away, Morrill says. “We are out running, so run.” Running away from an awkward situation may seem rude, but Morrill advises leaving manners aside if the situation requires it.

If you’ve been cornered and you can’t run away, yell with all your might. Morrill recommends using clear phrases like: “Take off!”. Another option is to say something that doesn’t make sense: your attacker will be puzzled and you’ll save time. Have a phrase ready before you leave.

Attacking is the last option, Morrill says. First, avoid being knocked out: bend your knees, put your torso forward, tuck your chin, and protect your face with your arms. If he catches you from behind, hit his face with his elbow. And if you’re in front, a kick to the crotch can be very effective.

Students use reflective tape on backpacks to stay safe at bus stops

WBTV is on your side tonight with a safety tip for parents looking to keep their kids safe at bus stops after Olympic High School student Zoe Deen was hit by a car and killed while trying to catch the bus along a busy street in southwest Charlotte Tuesday morning.

According to police Zoe was not wearing any reflective clothing and the street was not lit with street lights.

WBTV learned Wednesday that administrators at Tuttle Elementary School in Catawba County have been providing reflective tape for students to place on their bookbags while standing at the bus stop.

“It’s a safety issue. If a car’s light bounces off it and they’re paying attention and they see it, hey, they see my kid,” parent Jason Lambert said.

Lambert has four children of his own and two of them have to catch the school bus before 7 a.m.

“My kids are very important to me. They keep me going,” Lambert said.

A WBTV reporter drove around the neighborhood near the bus stop where Deen was killed. After the sun set it was clear just how dark the streets can become.

However, with the reflective tape placed on some of the students, it’s clear figures are moving in the darkness.

“It looks like it’s glowing like a glow stick,” student Nitara Lambert said.

The principal at Tuttle Elementary tells us that some school bus drivers in the county have had trouble spotting some students in the darkness and this year county officials decided it would be okay to offer the reflective tape to students.

“When there’s that movement to be able to see and recognize that that’s a student coming toward you then that just helps the bus driver out. From a safety standpoint. I think it’s a great idea,” said Mitzi Story, the principal at Tuttle Elementary School.

Students Shiloh and Nitara Lambert both agree.

“I like how I want to be safe and they want to make me safe and I like how cars can see me,” Nitara said.

The story said she would recommend the reflective tape to other local schools.

How to: service your lifejacket

Attitudes to wearing lifejackets have changed slowly but surely says offshore sailing instructor and Rubicon 3 founder, Bruce Jacobs. As with car seatbelts, lifejackets are something that we automatically wear out on the water rather than just something to be worn in extremis. Personal responsibility and good seamanship do much to avoid a man overboard, but modern lifejackets are more lightweight and comfortable to wear than older models, giving us little reason not to put one on.

Part of this change has also been that lifejackets are seen as personal equipment, part of an individual’s sailing gear for which they are personally responsible, though many boat owners still carry lifejackets for their full crew.

Either way, you need to be confident that your lifejacket or lifejackets are in good working order, and can be relied upon in an emergency.

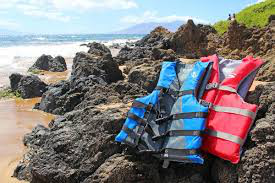
Lifejackets have a hard life. They are used and abused during the season, soaking with saltwater, dried in the sun, or shoved damp into a cramped locker. Giving it a thorough check and service, at least once a season is vital, as well as checking a few key features throughout the season. If you haven’t had your lifejackets serviced professionally in a couple of years, it’s worth doing to give them a more thorough set of checks, and for the peace of mind that everything is in order.

1

Life jackets have a tough life, but they need to be in good condition. Look for wear or chafe on the outer casing. Then look at the harness – run your hands down the webbing, looking closely that the stitching in good condition, and that there are no cuts, tears or UV damage. Then look at the buckle. If it is made of metal there is little that can go wrong, but check it’s not bent and the webbing attachment is in good order. If it’s a plastic buckle, make sure there are no chips or cracks, and the spring arms work correctly.

2

The crotch strap is an essential part of the lifejacket for keeping it close to your body in the water. The weak link here is the plastic buckle on either end as they are prone to be trodden on or caught in a hatch. Check both arms of the male part and the surround of the female part. There should be no cracks or splits. Replace it if there are.

3

Open up the casing by pulling open the zip or Velcro closure. Take some photos of the folded bladder, and at each stage, to help remind you how to repack it correctly. Unfold the bladder and look for any sign of physical damage, mould or mildew. A corroded gas canister can be rough enough to damage the bladder. The reflective tape needs to be fully attached and in good condition, and the stitching should all be intact. Now is a good moment to look after the zips if you have them. A bit of silicone spray will prevent friction and protect the zip.

4

The equipment attached inside the lifejacket is critical in a real man overboard. Check that the whistle is attached. If the light (and yours should have a light) has a test button use this, or trigger the light by dipping the contacts into water. Make sure the oral inflation tube is in good nick – you’ll check the valve when you inflate it. If you have an AIS beacon or a PLB attached, use the self-test function on this. The hood is another essential piece of equipment to prevent secondary drowning. The seams and windows can degrade over time, so replace this if necessary.

5

On a manual-only firing mechanism, the lever should be closed and the green tag in place. This will be the case on the manual trigger for an automatic too, but you’ll also need to check the automatic cartridge is in date and has the green end cap in place. If the end is red, it’s been fired. If you do need to replace the canister, cartridge, or clips, be sure to use the correct one for your lifejacket.

6

Next, unscrew the gas cylinder. This is fairly susceptible to corrosion as they sit in a damp environment for much of the time. Check the outside of clinder and the screw threads, and the end cap should be intact and not punctured. If that’s all in order, screw it back in. If not, replace the canister and check any rubber o-rings. Check the cylinder matches the specification printed on the lifejacket.

7

The central part of a lifejacket service is to check that it is airtight, and remains so for an extended period. To do this, take the end cap off tube and inflate; you can blow into it, but this will introduce moisture. Lifejackets contain a powder to prevent the bladder surfaces from sticking to each other, but the moisture in your breath can prevent this work. It’s better if you can use a pump so the air that goes in is dry.

8

Inflate to fairly firm pressure. You can submerge it for a bubble test, but make sure you have removed the cartridge first, so it doesn’t dissolve the salt crystal and fire the canister. The only failsafe test, however, is to leave it overnight for at least 12 hours, ideally 24 hours. While you’ve got it inflated, it’s a good time to try it on and find what it’s like to wear. Particularly, have a go at finding and deploying the hood – it’s not always easy and it’s vital to know how to do this before you need it for real.

9

If having left the lifejacket overnight, you find it has lost a significant amount of pressure, it is probably at the end of its life. You could send it back to the manufacturer to check over, but you shouldn’t use a lifejacket that leaks. It’s probably time for a replacement. Every lifejacket will include a service record, which will tell you when it was last professionally serviced. If it hasn’t been done for a while, it is worth sending it for a full overhaul, even if it stays inflated, for thorough testing and peace of mind.

10

If you are happy the lifejacket has no leaks, use the inflation tube cap and invert it to release the valve at the end of the inflation tube. It’s crucial to make sure all the air is out, so be patient, or use a foot pump to deflate. Don’t use a finger or anything else that could introduce dirt or debris into the valve.

11

Slide the gas canister into any holding clips or coverings, as this helps prevent chafe. Screw the canister into the firing mechanism; it should be hand tight but not so tight as to risk damaging the threads. The bottles can work loose during the season, so this is something you’ll want to check regularly.

12

Screw the trigger cartridge back on but don’t overtighten it. Check the manual toggle and lay it so it hangs outside the bladder. Replace the green clip over the manual firing arm.

13

Make sure you’ve checked your lifejacket instructions on how to repack it, as each lifejacket model can have its intricacies. It’s important that if you have a separate bladder inside, the bladder is folded not rolled, as this can prevent the bladder inflating. Take care not to trap the bladder in the casing closure and check that the lifting becket is easily accessible and properly stowed. Make sure the crotch strap is done up. Finally, stow your lifejacket somewhere dry and protected.

Life Jacket Exchange looks to get you fitted for safety before summer

If your child still needs a life jacket for the summer, sheriff’s deputies want to help out.

The Lane County Sheriff’s Office is holding its 9th annual Life Jacket Exchange event later this month.

Experts will be on hand to check jackets for form, fit and function. You can bring your child’s outgrown or lightly used life jacket to the event, and it’ll be exchanged for one that fits properly.

The sheriff’s office is also asking for new or gently used youth-size life jackets to be donated for the event.

“Lakes and rivers, we have so many water sports and great opportunities to get out on the water here but it’s just so important for folks to wear their life jackets when they’re out there and will use this opportunity to get the word out,” said Tim Chase, with Lane County Search and Rescue.

If you don’t have a life jacket to exchange, chase says it shouldn’t be a problem to provide your child with the right fitting jacket.

The free life jacket with reflective tape exchange event is set for June 15th and 16th at Cabela’s in Springfield.

You can donate gently-used youth-sized life-vests now until then at the Sheriff’s Office in downtown Eugene.

Lifejackets and life lessons for children

Children learning skills to use life jacket correctly children learning skills to use life jacket correctly

Thanks to a grant from Maungakiekie-Tāmaki Board, the Onehunga War Memorial Pools are now incorporating the safe use of life jackets into swimming lessons and boat safety sessions.

“Safety on the water is paramount for our communities” explains Chris Makoare Chair of Maungakiekie-Tāmaki Local Board, the area where the Onehunga suburb is located.

“The Board is a firm supporter of programs which help improve water safety awareness. We have some great beaches in our area as well as popular boating areas, so it just makes sense for us to support lifejacket education.”

“As part of our swim school we teach kids about life jackets, we hope that they’ll never need them in a real-life situation of course, but if needed these lessons should help them to not panic,” explains Gillian Moore, Swim Instructor at Onehunga War Memorial Pools.

“We start by showing everyone how to put on their jacket correctly, with the smaller kids we tell them it should be tight like a squeezy cuddle from Mum or Dad.”

“We advise that a lifejacket with reflective tape must always be worn when on boats, paddleboards, etc.

We also show them how to signal for help and how to get into an individual huddle and a group huddle to keep warm in cold water”.

Children are taught in increasingly deep water so that they learn to rely on the lifejackets for buoyancy.  For some, a raft or boat is bought into the pools and students are provided with a scenario of falling from a boat.

“It’s great to watch kids respond as they have been taught, we know that they leave the course with skills that hopefully are with them for life”.

School Spring Break Requires Extra Caution

“Talking Glass” Audible Stories on Signals AZ made possible by The Fain Signature Group – Celebrating 60 Years of Community Building.

The Dewey-Humboldt School District will be on Spring Break the week of March 9-13, 2020. With support from the Arizona Governor’s Office of Highway Safety, the Prescott Valley Police Department is focusing on a pedestrian, bicycle, and motor vehicle safety. Fewer school buses transporting students to mean more vehicles, pedestrians, and bicycles on the roadway.

Kids, walking, street, school kids

Many areas in Prescott Valley do not have sidewalks or streetlights. The Prescott Valley Police Department recognizes the danger to our students in these areas. We encourage parents to teach children to walk against the flow of traffic. Also, please remind them to be aware of their surroundings and not to be distracted with their cell phones. Lighter-colored clothing, reflective tape, and flashlights are also recommended for quick identification by drivers during nighttime hours. Together, as a community, we can help keep our children safe.

Spring Break also tends to see an increase in car and residential burglaries as well as other mischievous activities. The Prescott Valley Police Department encourages all residents to make sure their homes and vehicles are secure when not occupied. Remove valuable items from plain sight and your vehicles. Take time to document (including photos) make, model, and serial numbers of valuable items. Most criminal activity is based on opportunity. Remove the opportunity and minimize crime.

Safety and Protection is the theme for police officers during Spring Break. If you see anything suspicious, contact the police department.

Are you going back on the bike? You must remember that

Vacation is the perfect time to return to physical activity. One of the most popular summer outdoor activities is cycling. However, do we remember the rules of safe and comfortable driving after a long break? How to inflate tires properly, adjust the saddle and what to wear for a bike ride? Advice!

When entering a garage or basement, do you avoid bike sight? Beautiful weather outside, and you wonder how to apologize with your two-wheeler? Before you get on your bike, remember some important rules. Together with Michał Fick, a rider of Volkswagen Commercial Vehicles MTB Team, we will help you return safely to cycling activity.

Safe vehicle = safe cyclist

Safety is the basis, so the first thing you must remember before getting on your bike is to check the condition of your vehicle.

Michał Ficek says: Effective brakes and the right amount of air in the tires are the absolute minima that our holiday transport should meet. It would be ideal to plan a visit to the bicycle service to make sure that all components of the drive system are working properly and that covering kilometers will not be associated with any danger due to the poor technical condition of the two-wheeler.

How can you check if your tires are properly inflated? The easiest way to do this is to press the tire with your thumbs at the end of the tread. If you can only make a millimeter dent, it means that your tires have enough air.

However, not only a functional vehicle guarantees safe driving. The cyclist must be visible on the road, so remember that your bike should be equipped with a front lamp with white or yellow light, a lamp with red light and a red reflective tape element placed at the back. Although the regulations do not require wearing safety helmets, it is worth protecting your head against any injury on any trip.

Attitude is the basis! Take care of the right position while driving

The right attitude is very important, no matter whether you play sports, walk or rest. Thanks to the right height adjustment of the bicycle saddle, we ensure not only a comfortable ride but also safety and comfort for our spine.

Michał Ficek says: First of all, pay attention to the appropriate frame size and saddle height. You cannot allow a situation when, during pedaling, our knees “run” sideways, we have a problem with reaching the pedals or unstable sitting on the saddle. The old school says that the right height of the saddle is one in which, sitting motionless in the saddle with the leg straight, we touch the heel with the pedal located at the most distant point of the crank mechanism rotation. Systematic riding in the wrong position can do us more harm than good.

How to properly set the height in a city bike? When riding on such a two-wheeler, the cyclist’s position is more upright, so the steering wheel must be set higher relative to the saddle (about 5 cm or more). In this position, most of the bodyweight is on the back of the bike, not on the hands.

First of all, convenience – a few words about a cycling outfit

During holiday trips, we are happy to choose a bike as a means of transport. Summer is a time when airy dresses reign, for ladies: dresses and skirts. Unfortunately, this outfit, although it looks impressive, is not a good option when riding a bicycle.

Michał Ficek says: When getting on the bike, we will forget about loose, long legs, which love to get caught in the chain. Occasional rides will not require special clothing – just comfortable, weather-proof shorts, a T-shirt and shoes. As the distance traveled on the bike increases and the time spent on the saddle, it is worth thinking about dedicated to this type of activity, more tight and at the same time airy clothes, in particular, shorts with a comfortable liner.

Appearance is not everything: apart from a comfortable outfit, for safety reasons, it is also worth putting on glasses that protect our eyes from the sun and getting sand, dirt or small insects into the eyes.

Measure your strength

The last thing to remember before getting on the bike is the right choice of route and load, adapted to the condition and possibilities. It is worth doing a short warm-up before the ride to prepare the body for physical exertion.

Michał Ficek says: If you return to the bike after a long break, remember to measure your intentions and start with short, undemanding routes. During the holiday we will feel a lack of physical effort for several months, so let’s approach sports activities with caution.

The solution to the mystery of the police only seems to be obvious

The police from Krotoszyn published two photos and ordered to look at them carefully. At first glance, we see a child in one photograph and not a second. But isn’t he there?

The Police Headquarters in Krotoszyn has published a puzzle on its Facebook profile, which consists of finding a difference in the pictures. The post contained two photographs that depict the autumn twilight on the street in the city. There is a difference, but is it true that there is a child in one picture and no one in the other?

The combination of these photographs allows you to see what drivers see when people on the road are wearing dark clothes. Only when we look closely at the second photo do we notice the child in a gray coat against the background of a tree. In unfavorable weather conditions, e.g. during rain, a child in such clothing is almost invisible to the driver.

Reflectors are a must

The police have published these photos for educational and preventive purposes. They show how important the color of our clothing is when we are on the road. The officers also encourage to wear reflective tape elements. Thanks to them, the driver will easily notice us on the street.

According to the law, everyone who moves on the road in the undeveloped area should wear them after dark. Wearing reflectors is important in autumn and winter. Early darkness, dark mornings, fog, sleet, and rain are not favorable for pedestrian safety.

“Seeing the shining point from afar, the driver has more time to react properly. The seconds gained in this way can save the health or even the life of a pedestrian,” policemen explained in an interview with WTK. The National Police Reflective Day is celebrated in Poland from October 1, 2016. The officers then conduct actions that are aimed at encouraging others to wear reflectors and remind them that thanks to them tragedies can be avoided.

Reflective elements should be worn so that they are noticeable by both oncoming drivers and those coming from behind. You will learn more about the importance of our clothing on the road and how to wear reflective vests.

Throw the book at m-cyclists for not using bike lanes

Every day, when I drive to work from Kuala Lumpur to Shah Alam along the Federal Highway, I see motorcyclists speeding in car lanes.

They do not slow down when motorists are trying to change lanes. Instead, the motorcyclists will blare their horns or show an obscene gesture at the drivers.

Their action causes motorists to panic, especially when they have signaled their intention to change lanes.

I also notice that motorcyclists are riding on all sides of the Federal Highway. They take up the fast lane and even block motorists.

These motorcyclists have to be reprimanded and banned from the road if they don’t use the motorcycle lane.

I also noticed that they fail to wear reflective safety vests with reflective tape at night.

Most wear dark jackets without any reflective materials. There are motorcycles without rear brake lights that put motorists or lorry drivers in a difficult position since they are not visible.

I urge the authorities, especially the traffic police and Road Transport Department, to consider this matter seriously.

There is a lack of enforcement and the law governing motorcycle use on trunk roads and highways in Kuala Lumpur and Selangor.

Motorcyclists must use motorcycle lanes provided for them along the Federal Highway.

They must ride on the left side of the road only along trunk roads. Motorcyclists should only ride on the left side of the road in highways.

They must also ensure that the rear and front lights of their machines are functioning.

They should wear reflective safety vests and failure to conform should result in them being fined RM1,000 and handed one-year imprisonment, or both.

Alternatively, ban motorcyclists or suspend their license for two years.

Abingdon and Barter Theater is coming together to make crosswalk improvements

The town of Abingdon and the Barter Theater are coming together to make major safety improvements.

In 2019, two people were hit while crossing the crosswalk in front of the Barter. And the Barter Theater was killed just before Christmas.

“A lot of people come to our theater every day and a lot of people cross that crosswalk,” said Barter managing director, Ross Egan.

Egan said they have all come together to brainstorm ideas to fix it.

“I’m starving the town is taking action in conjunction with Barter to make sure it’s as safe as we possibly can have it,” he said.

Public Works Director John Dew said they were taking a fresh look at what they could do to improve the crosswalk.

“We’re taking a look at lighting, sidewalk visibility, sight distance and clarity from the pedestrians,” said Dew.

The town has been added reflective paint and cleared out landscaping that was blocking the view.

“We’ve always kept it at a low height, but given the two incidents we’ve decided to clear that out,” he said.

Dew said in the future they are going to add reflective tape to the signposts and possibly add more lighting.

“We’re open to listening to any ideas on how to improve it because obviously, we don’t want any other incidents as we’ve had,” he said.